Honda scooter information center |
VIN information for Honda scooters
Also includes years of manufacture & paint schemes
50, 80, 125, 150, and 250 models
Service manual part numbers for Honda scooters (work in progress)
NA/NC50 Express 1978-82 6114707 NC50-NC50II 1977-82 6114707 NU50/M Urban Express 1982 61GC100
NX50NM Express SR 1981-82 6118701
Brochures
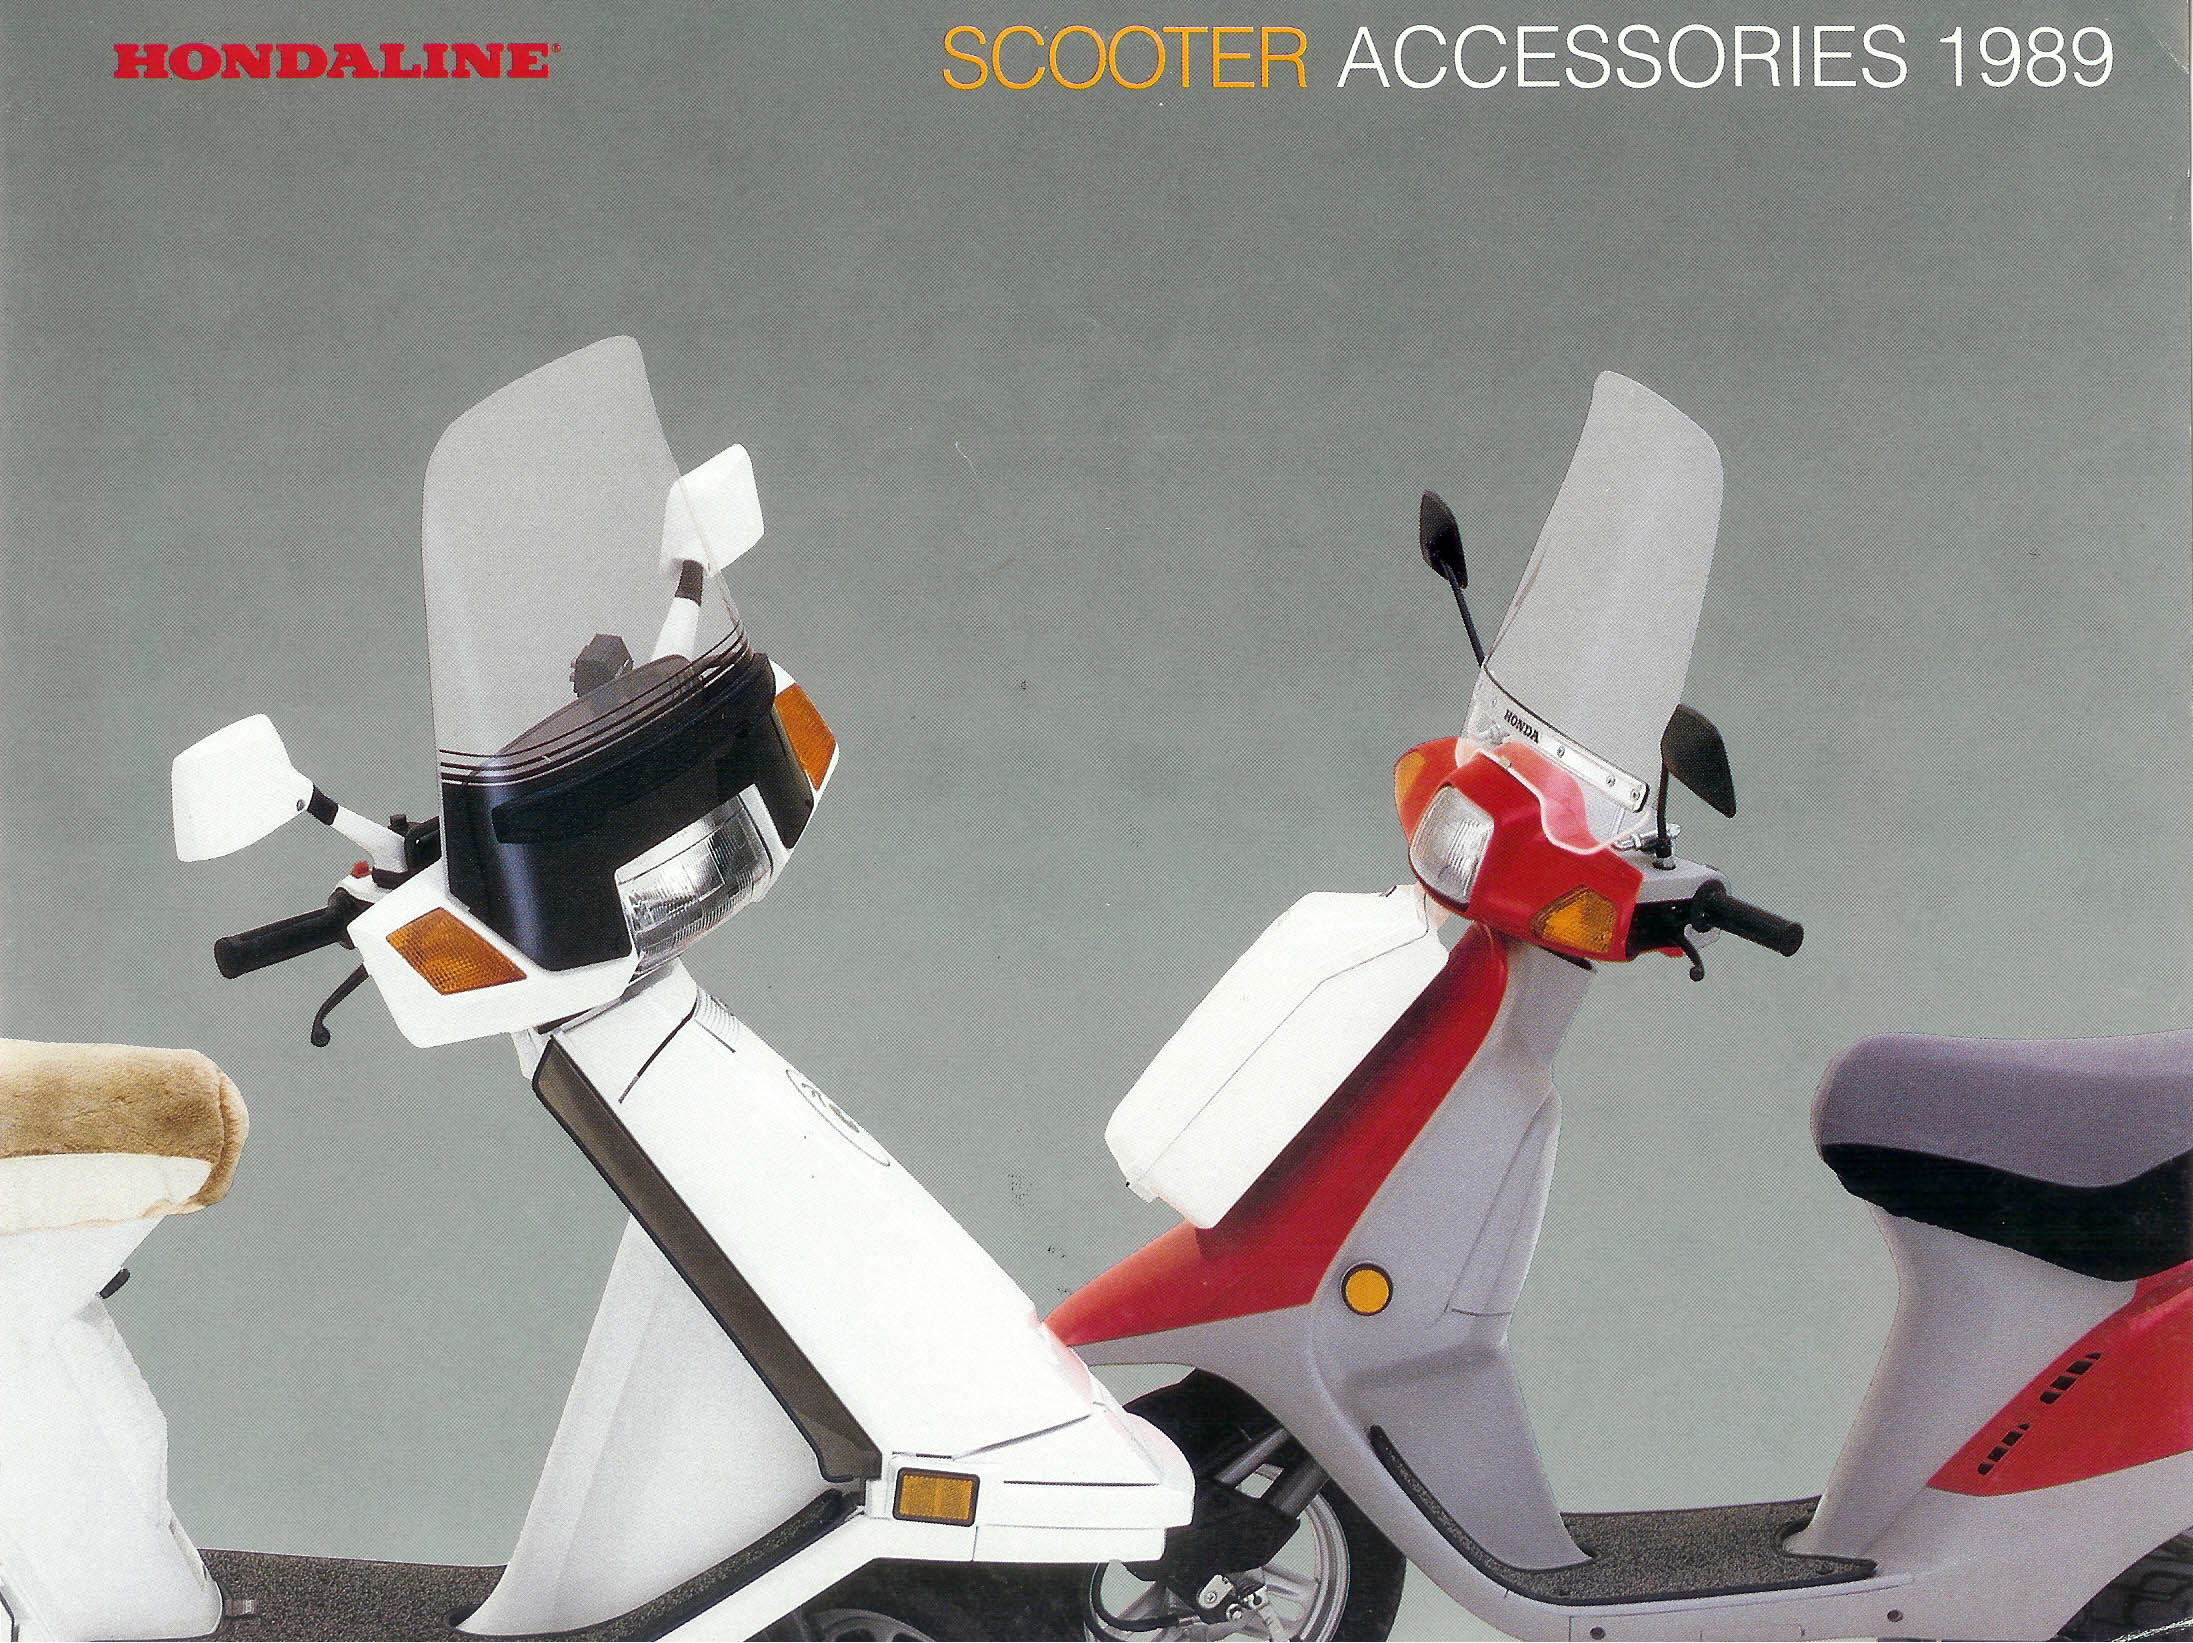
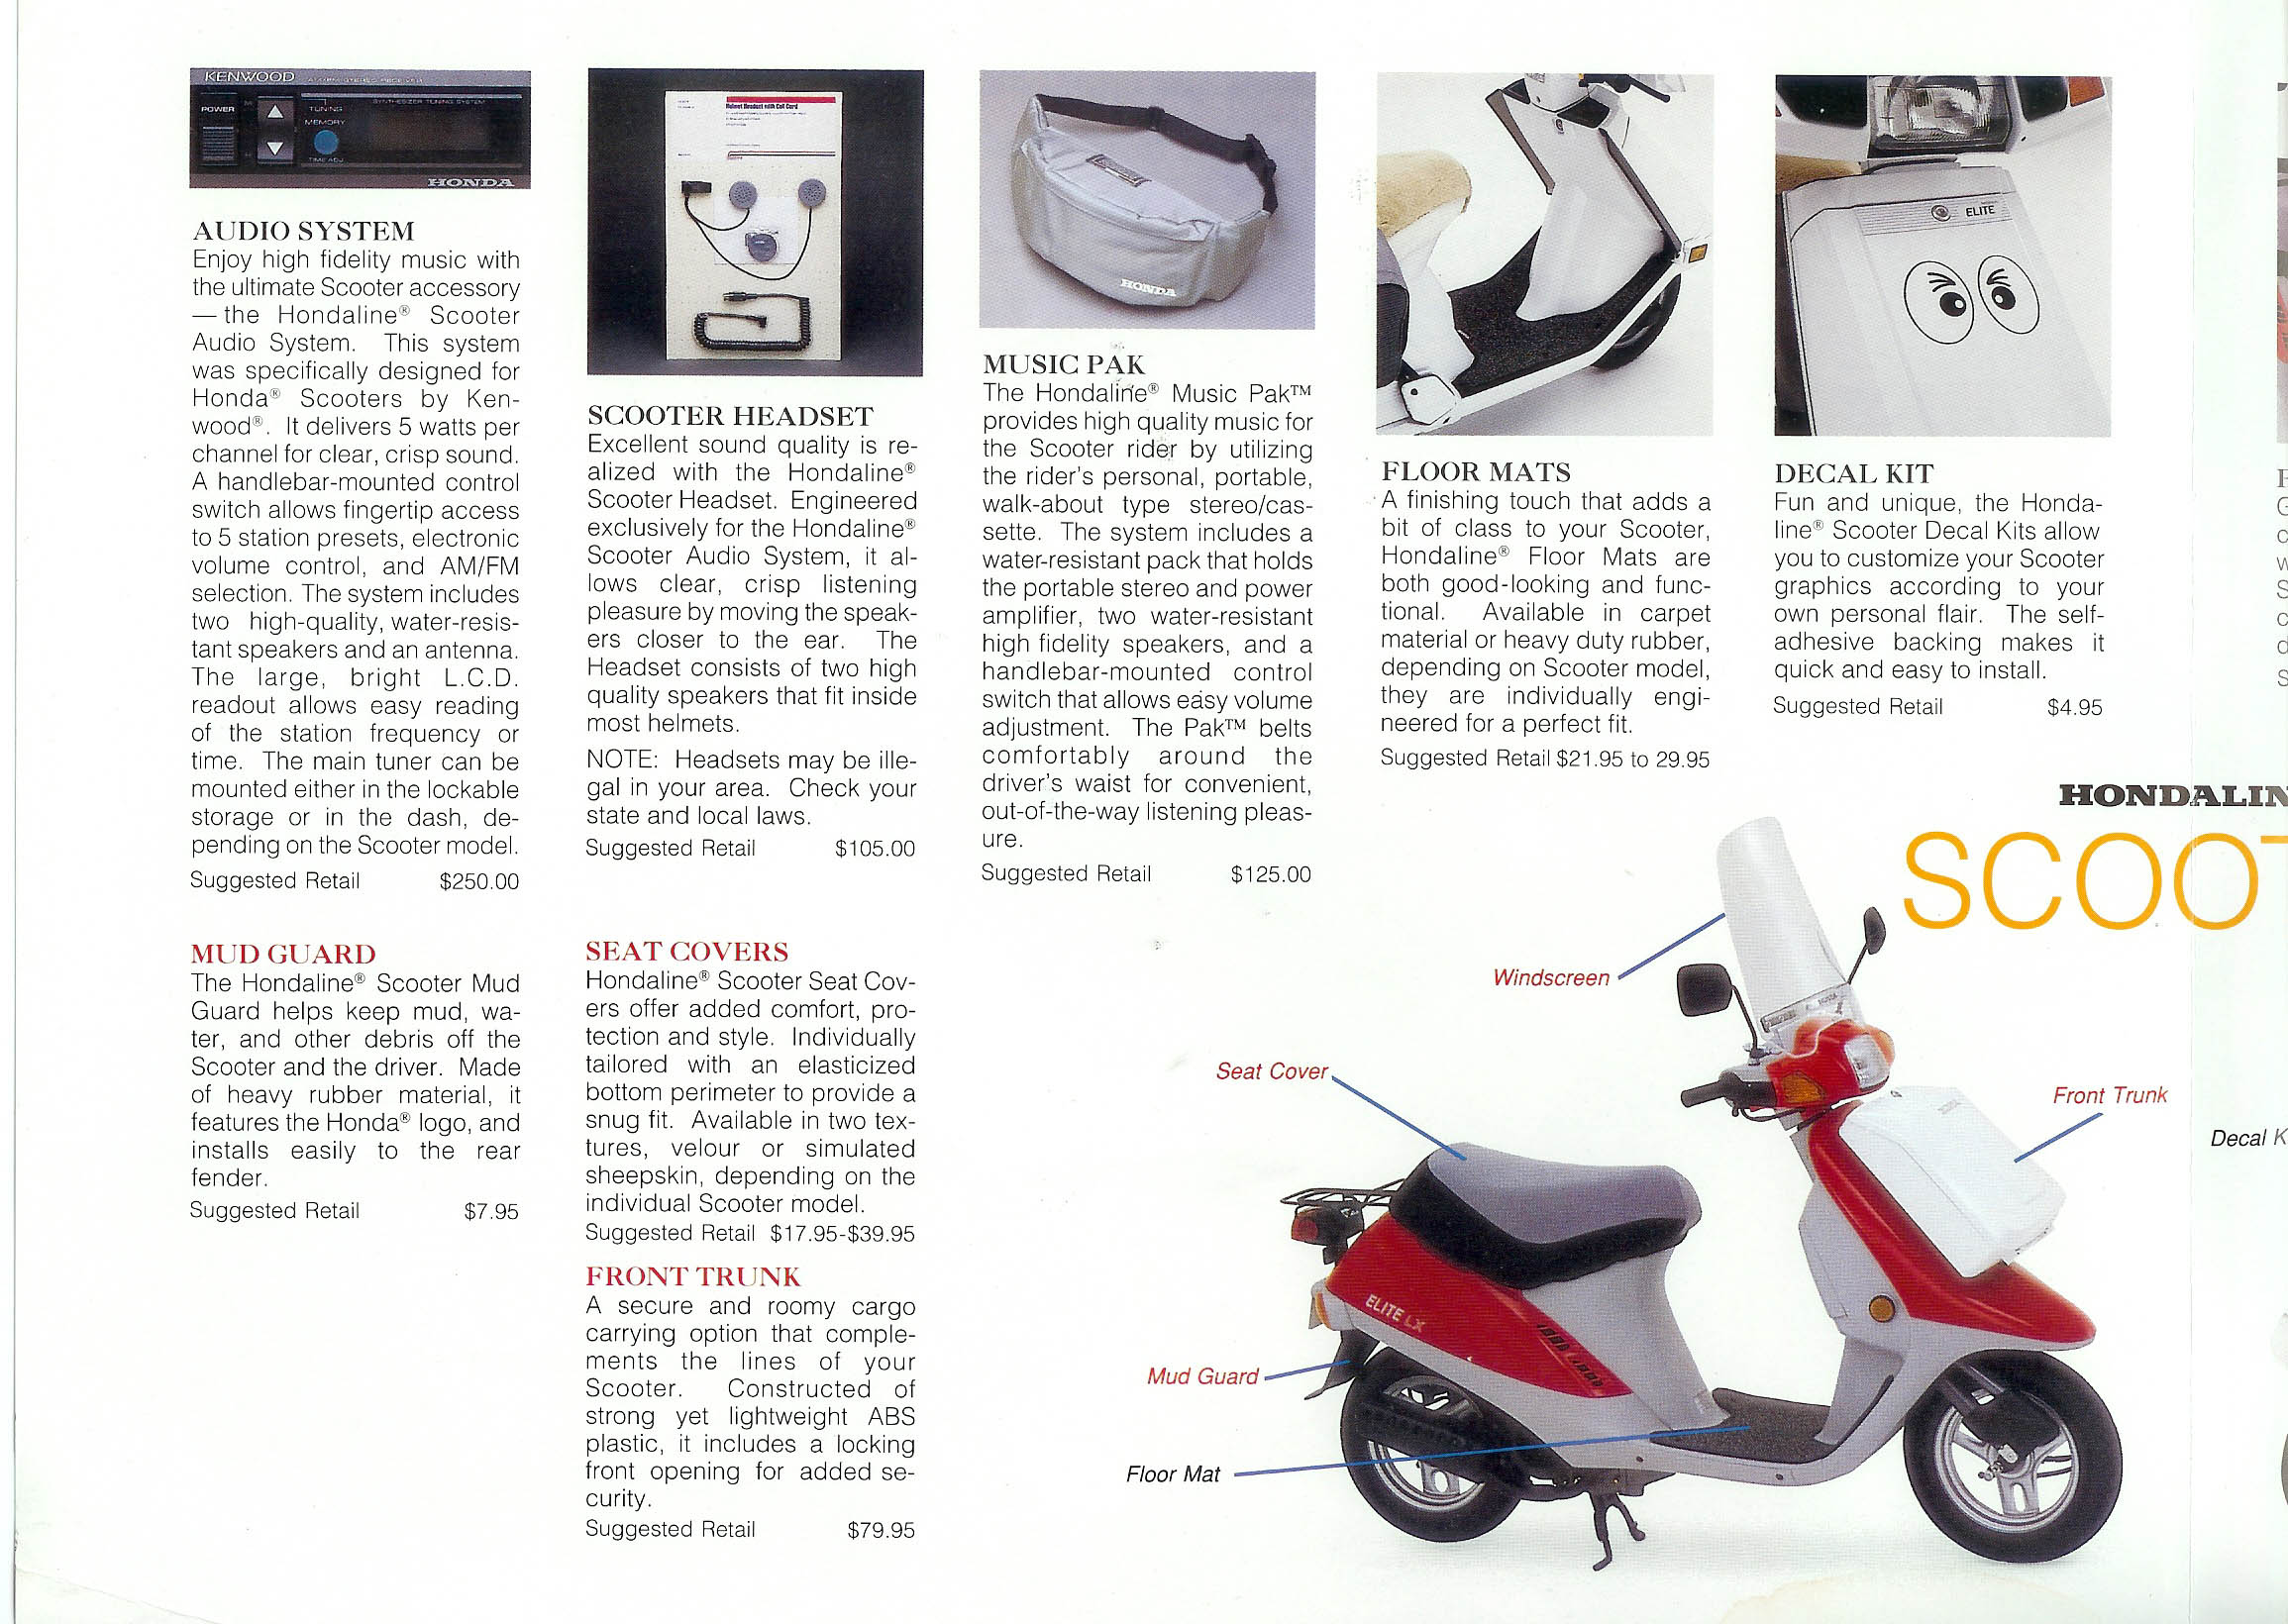
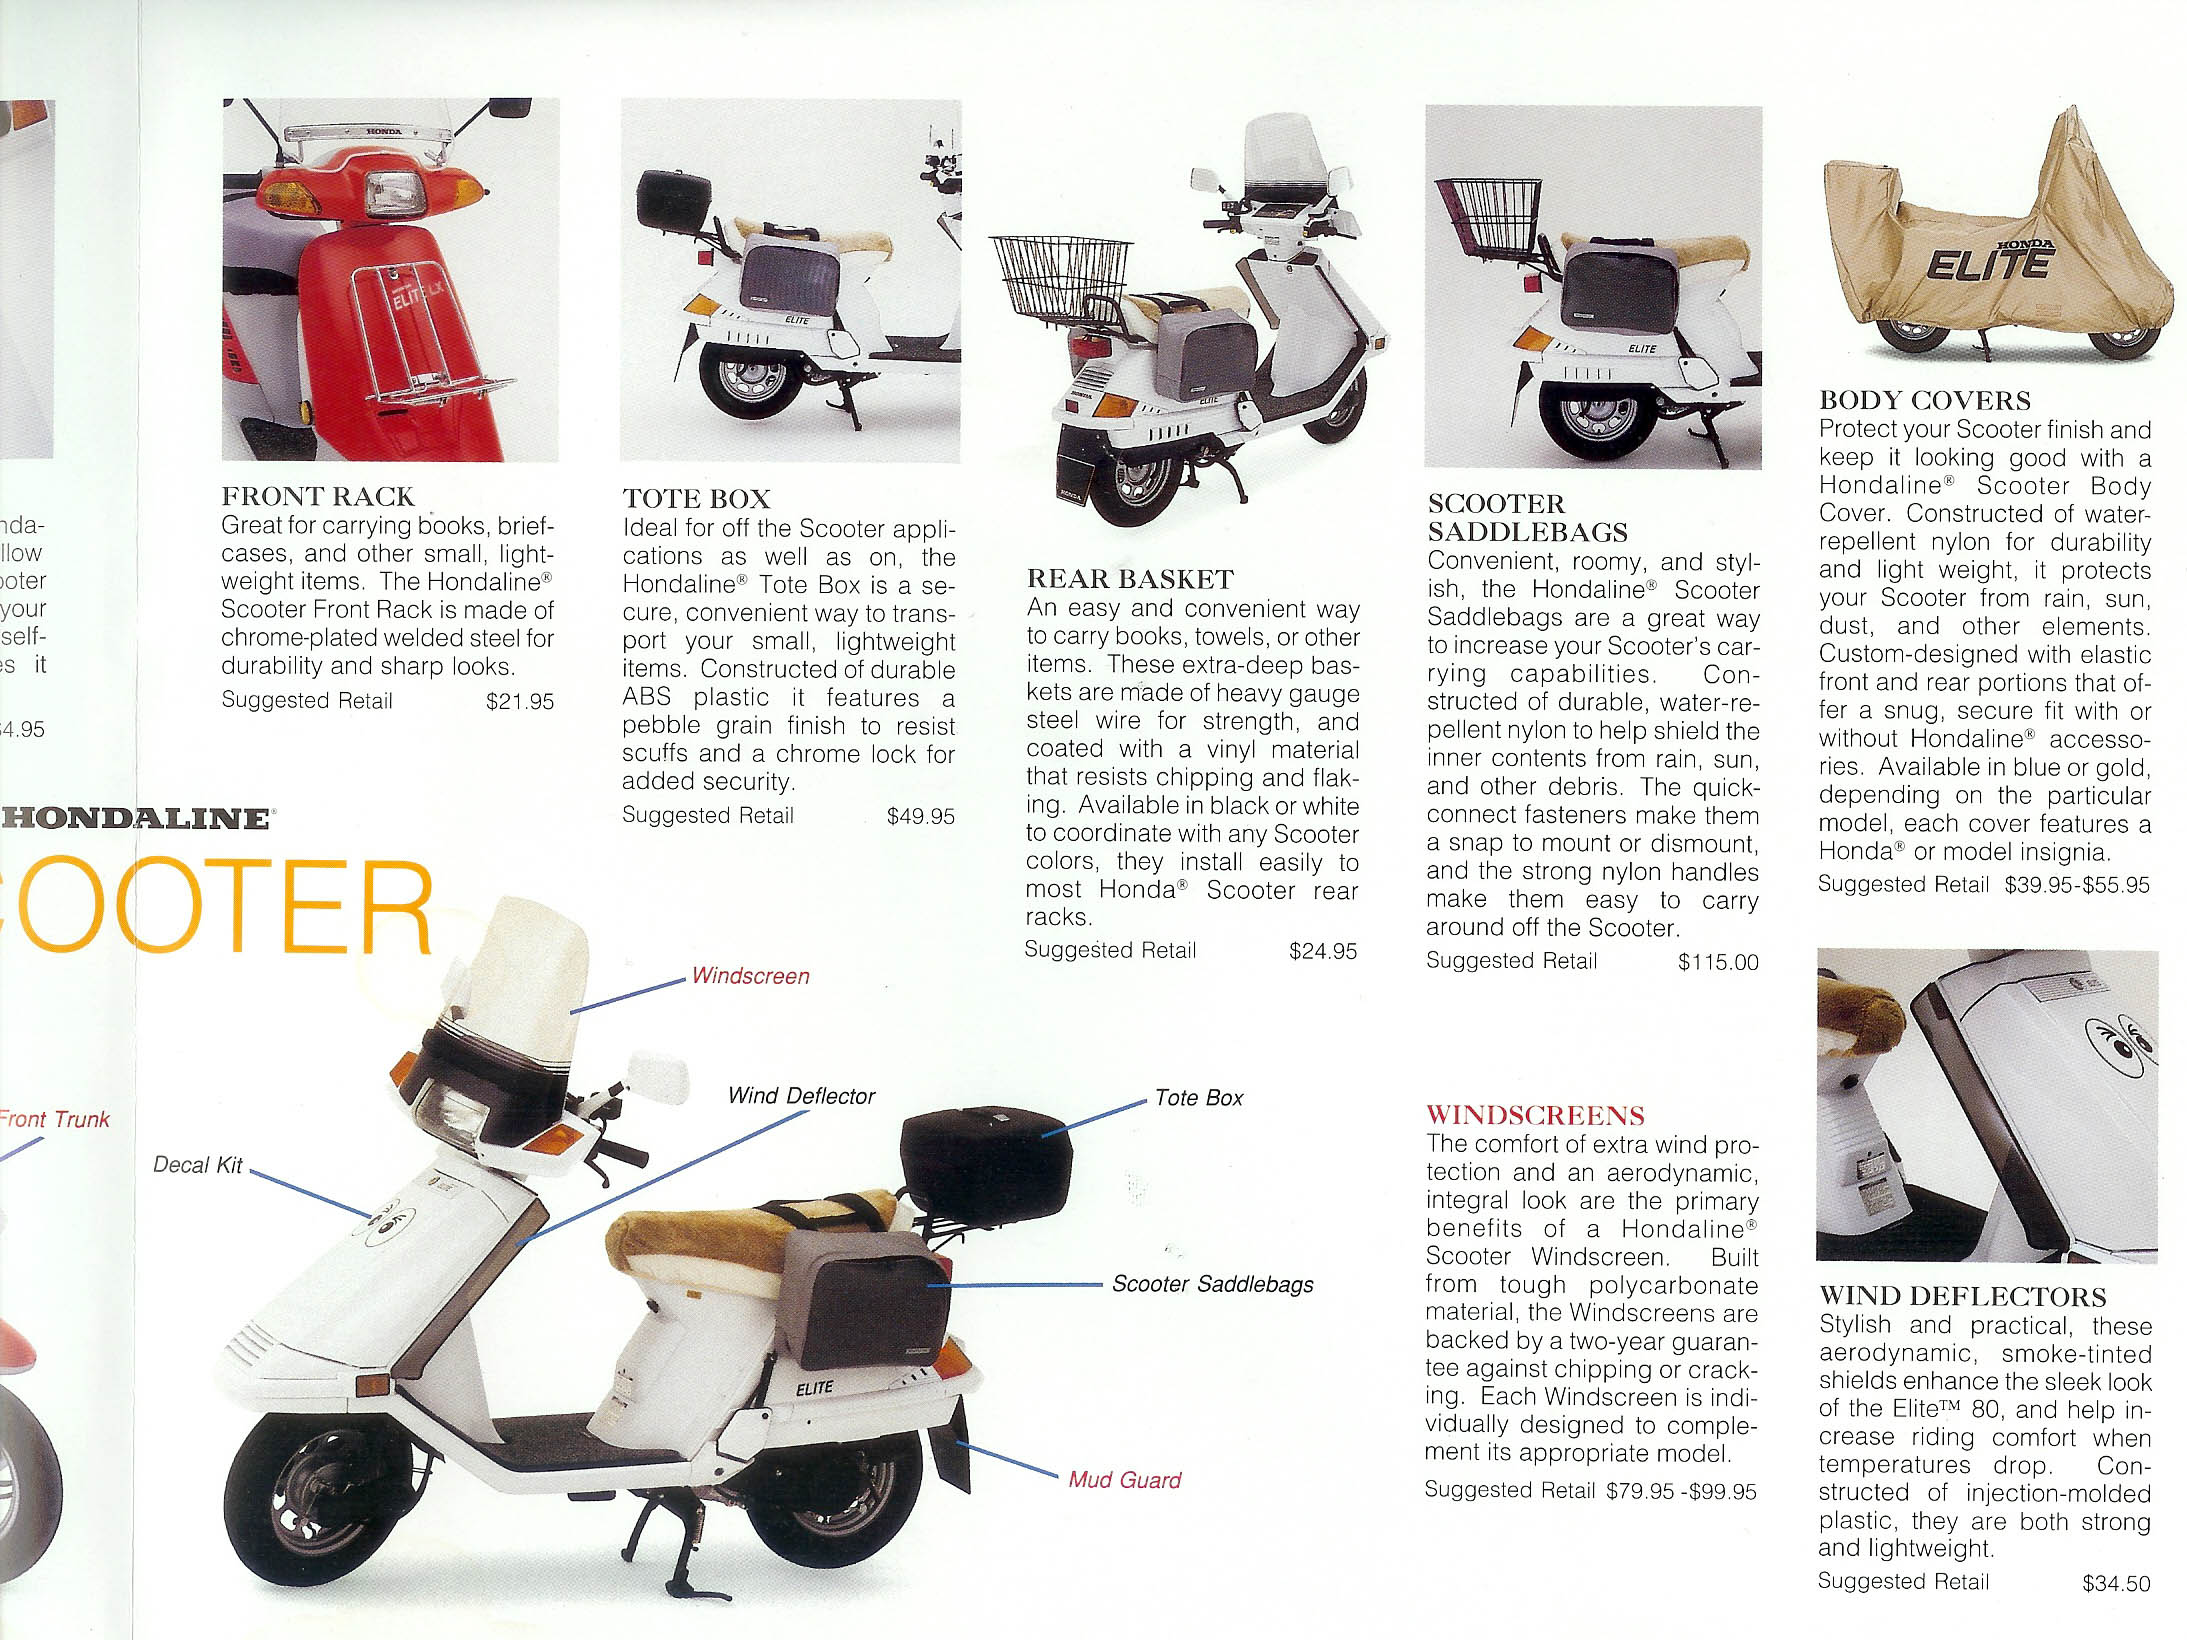
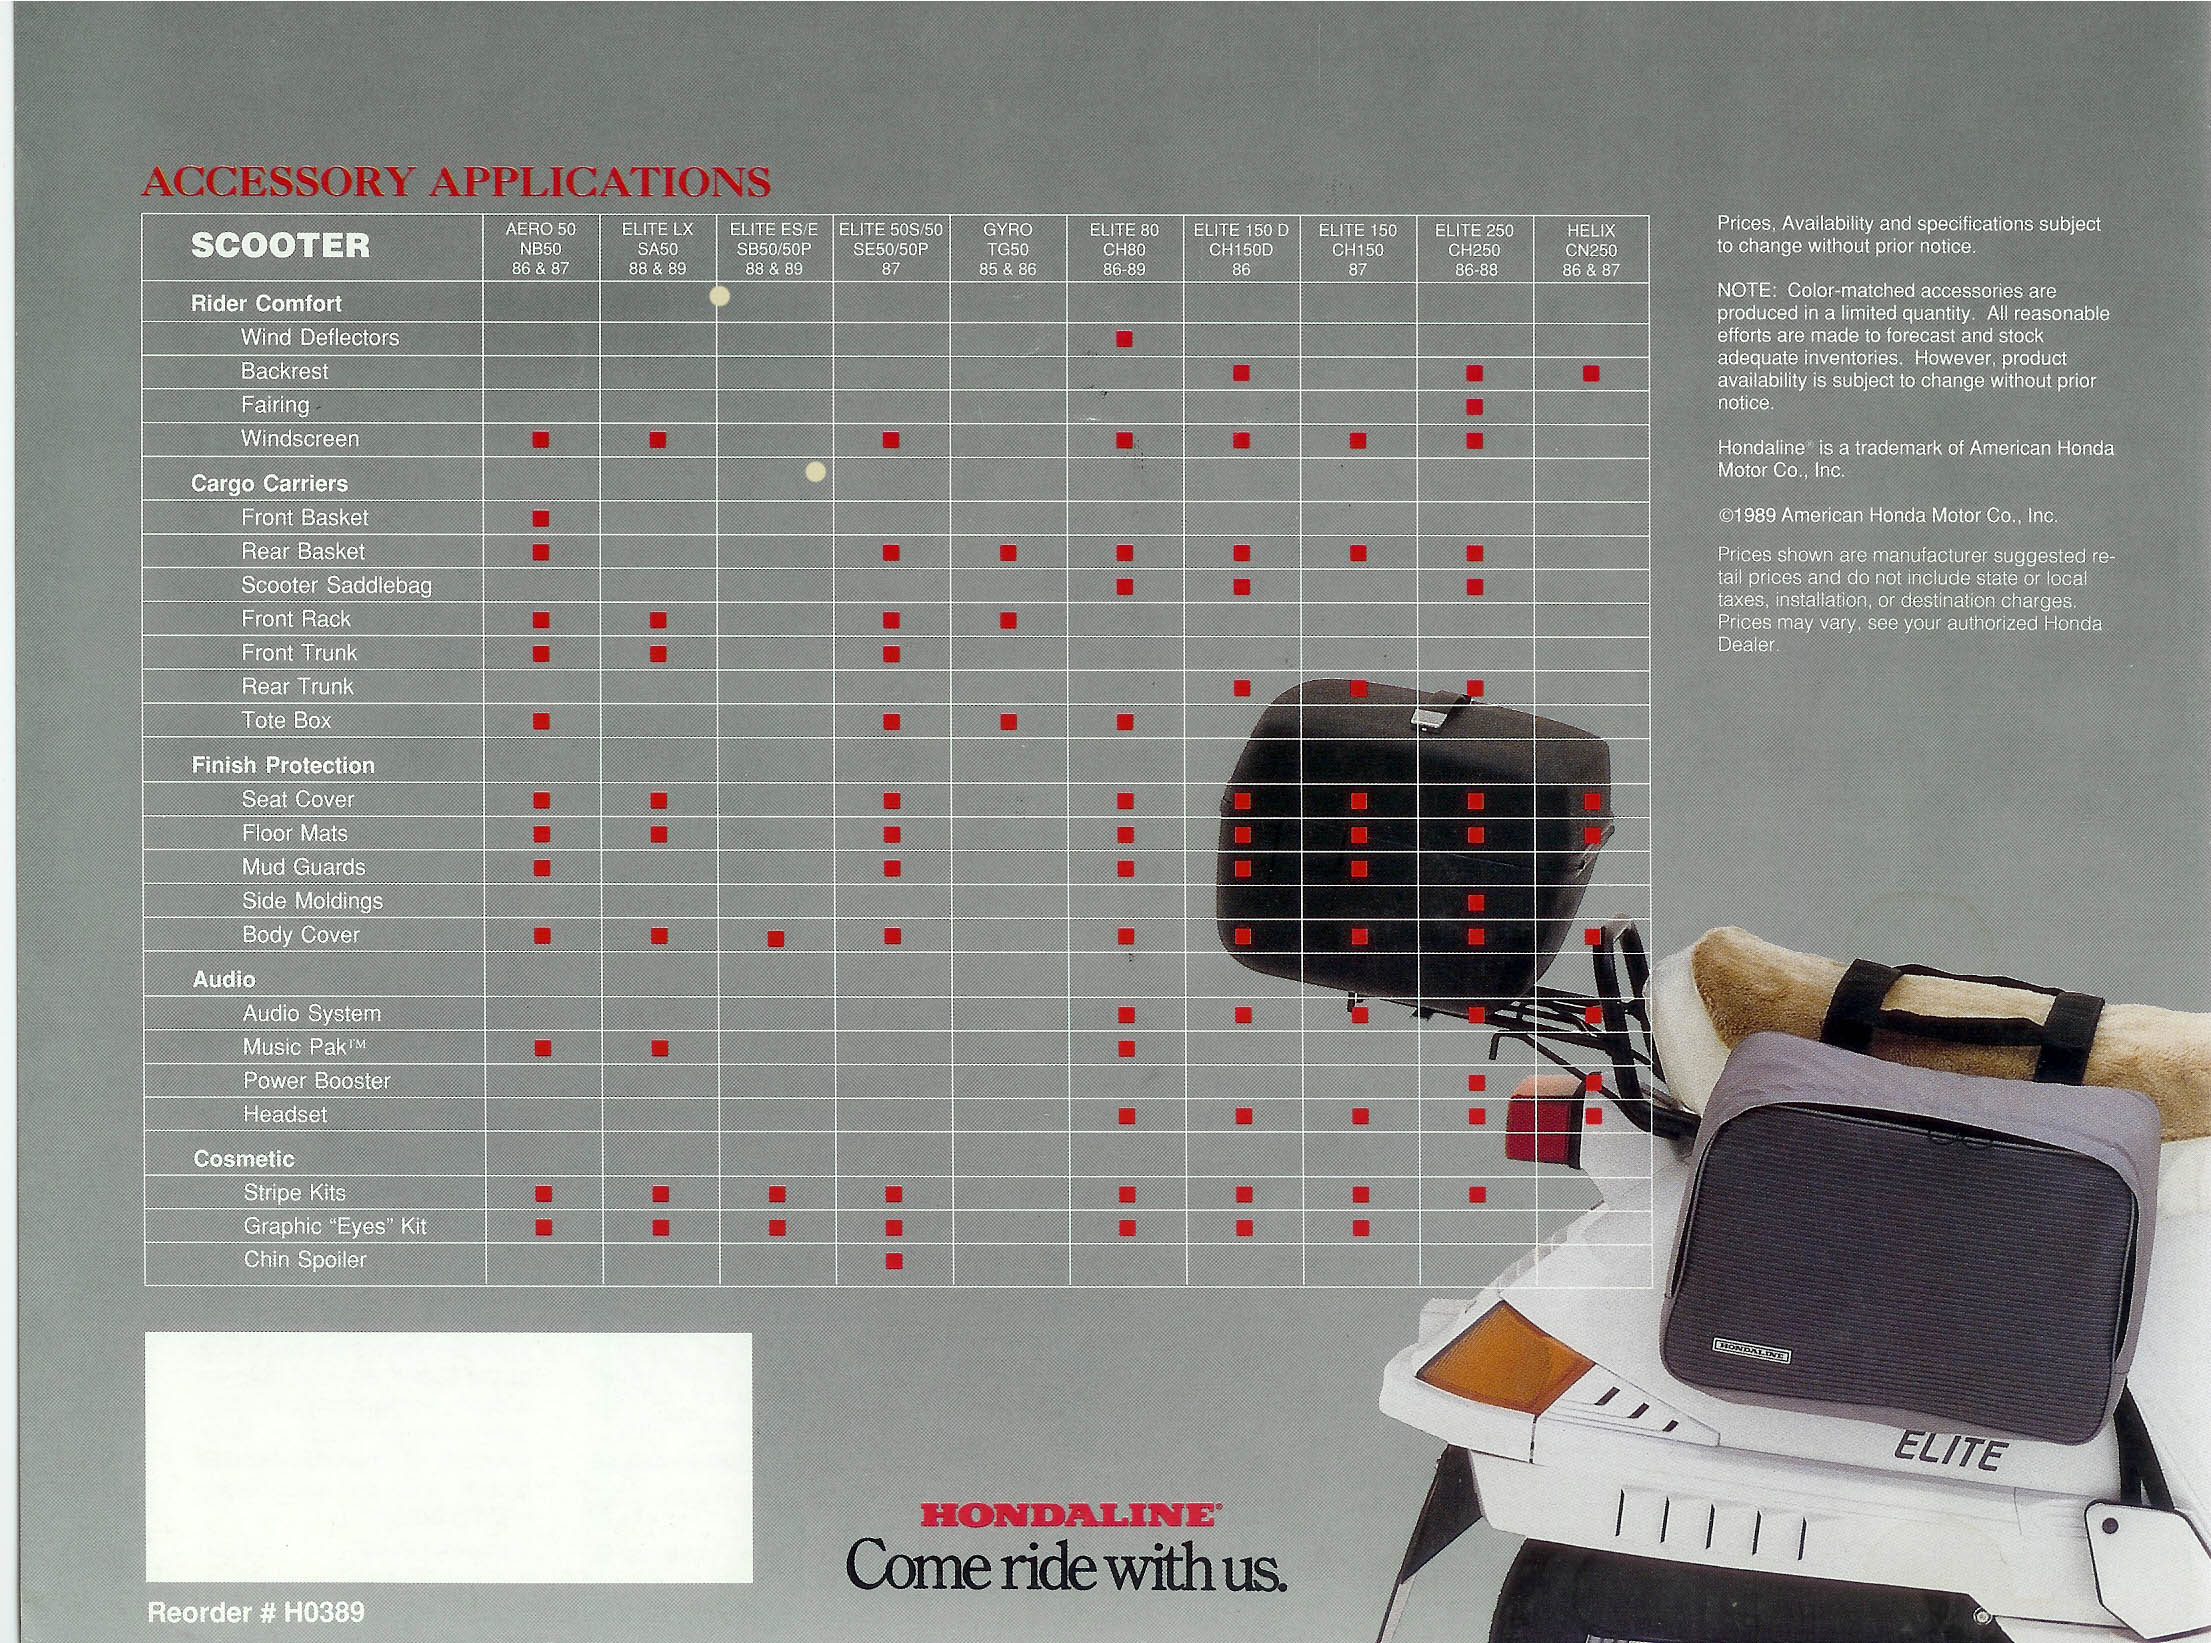
Check out these scans of the original Honda sales brochures| 1989 Scooter Accessories page 1 | full size | small | 1989 Scooter Accessories page 2 | full size | small | 1989 Scooter Accessories page 3 | full size | small | 1989 Scooter Accessories page 4 | full size | small |
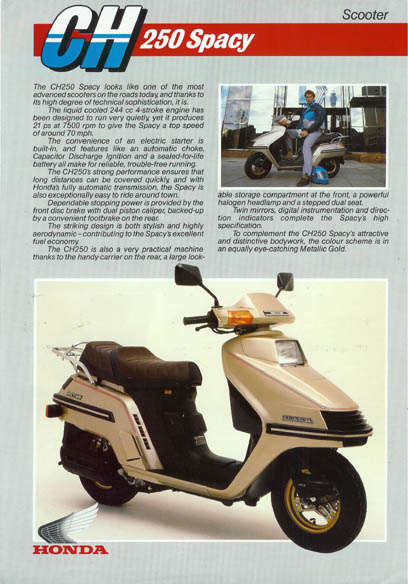
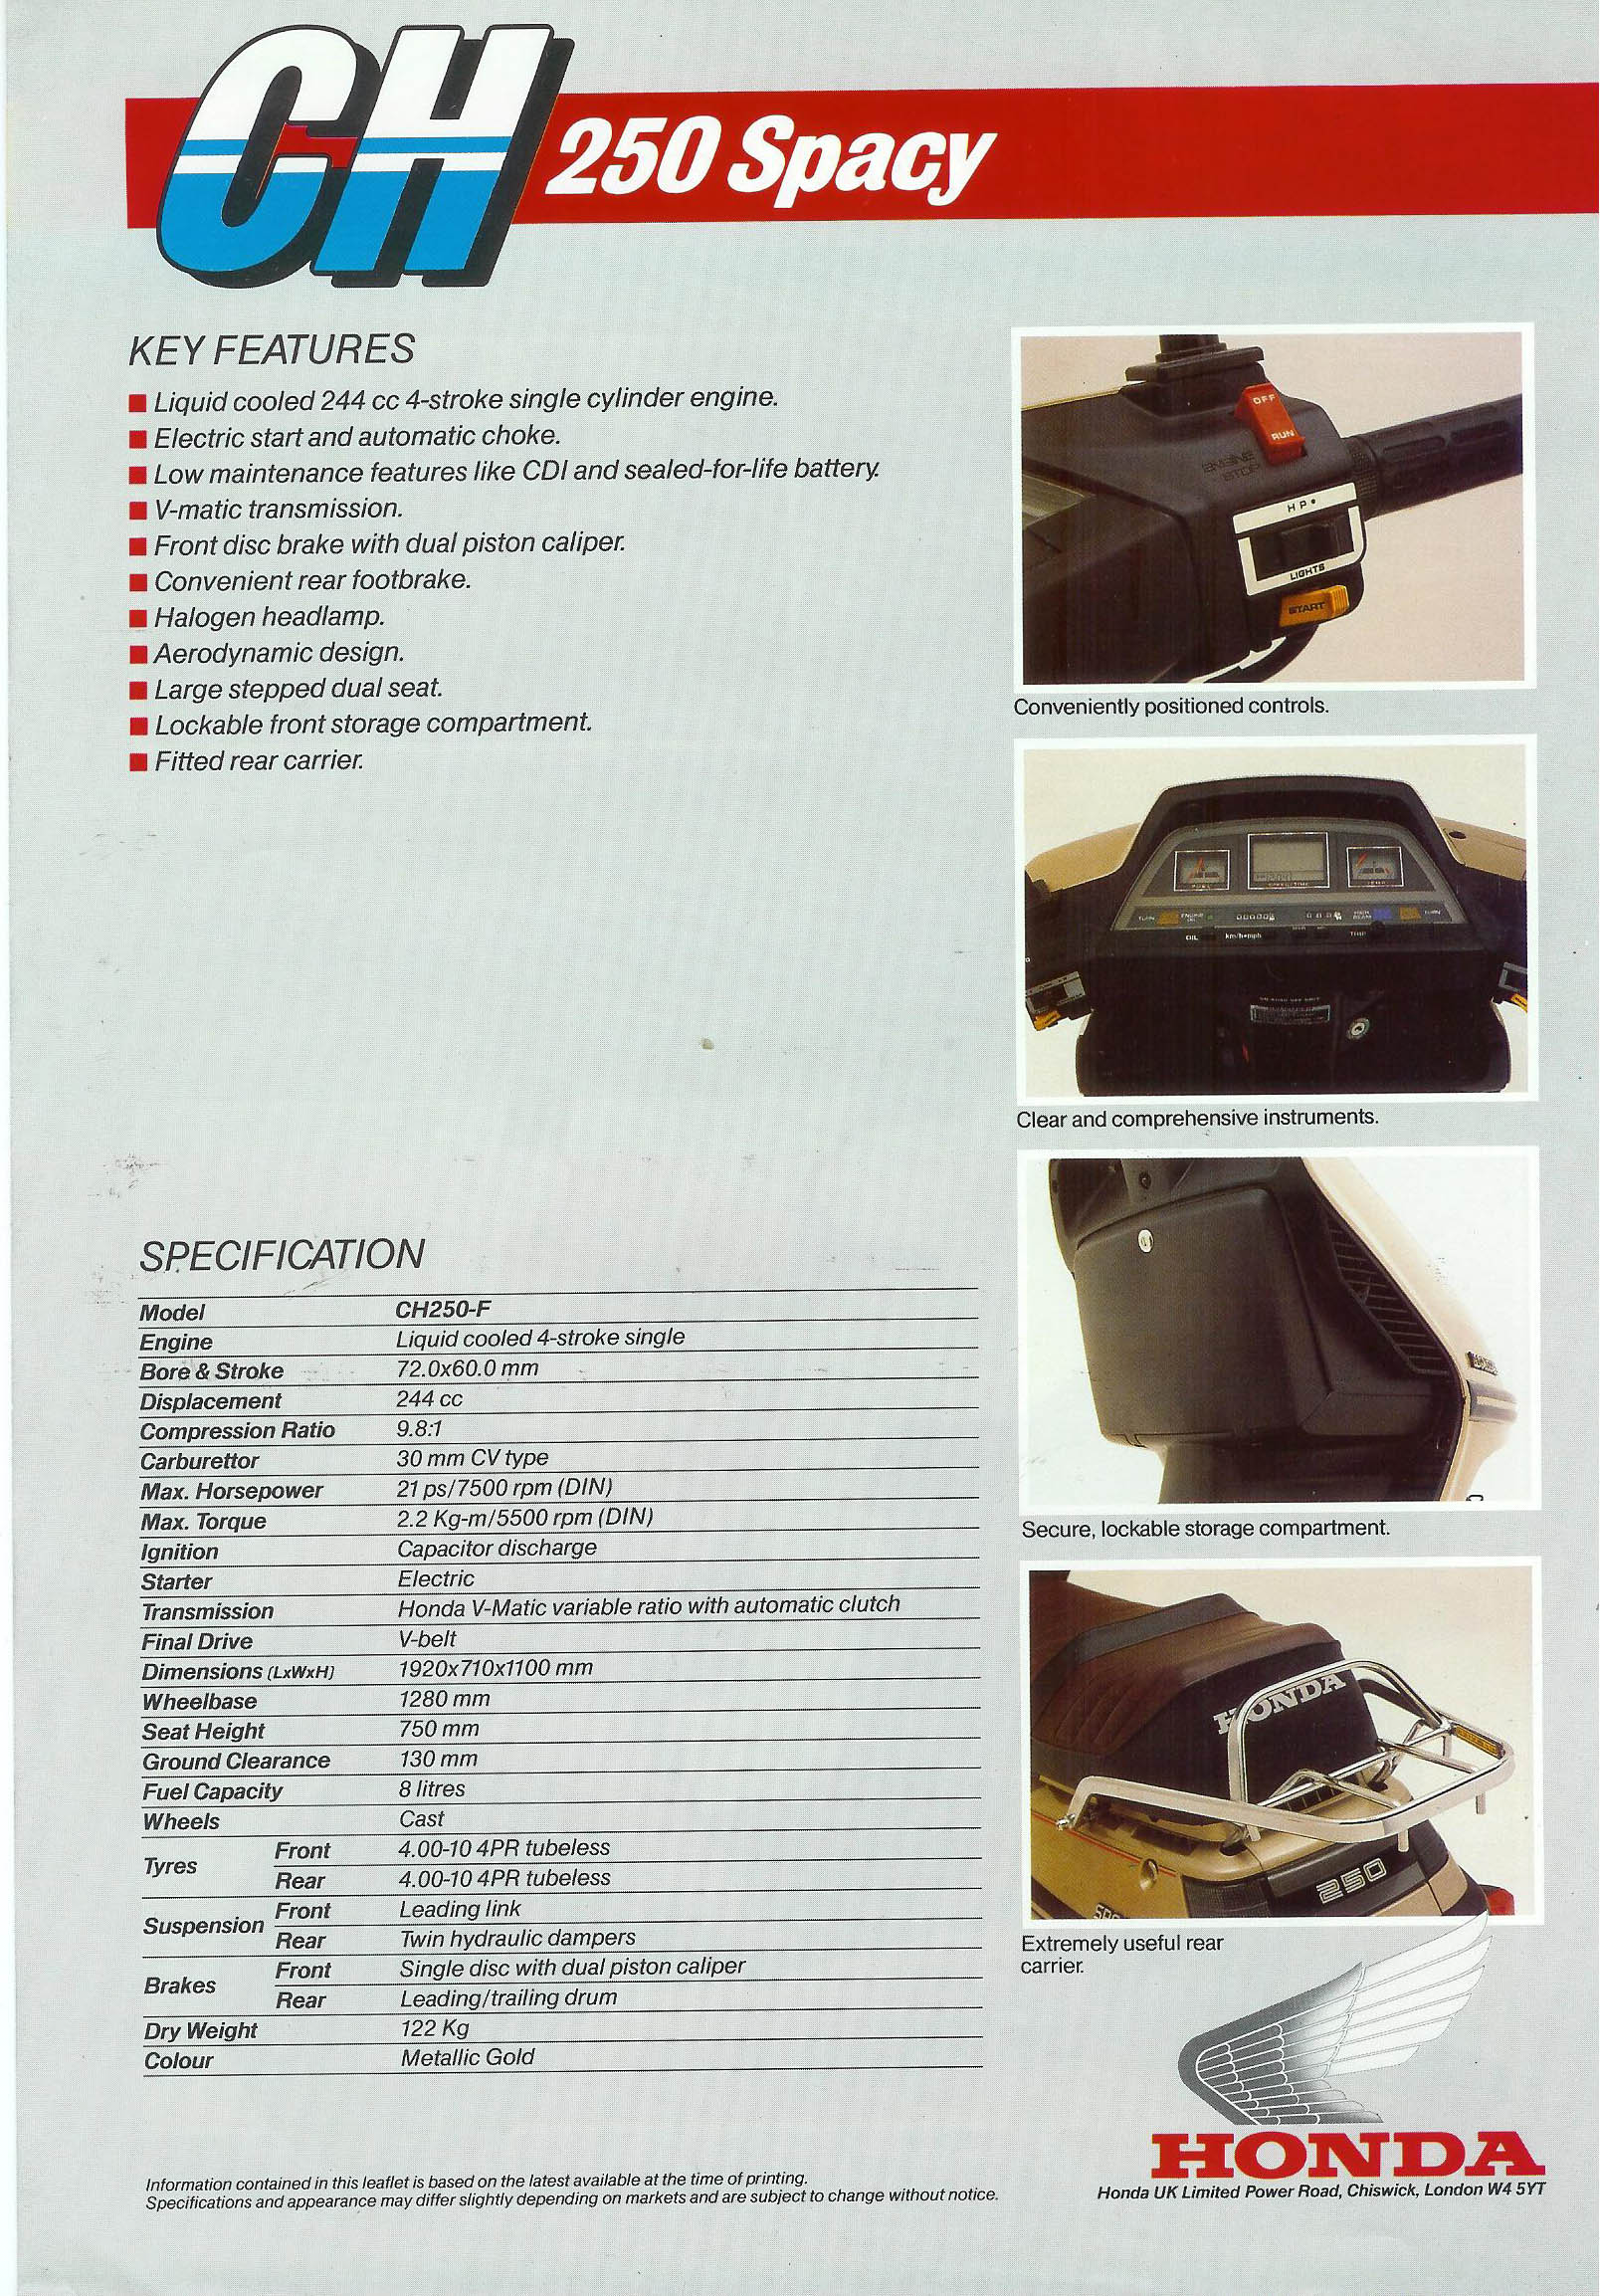
| 1985 Elite 250 European brochure front | full size | small | 1985 Elite 250 European brochure back | full size | small |
More to come...
Maintenance Information
Here are several maintenance schedules, taken from the factory service manuals:
NX 50 Express NA50 Express II / NC50 Express NU 50 Urban Express PA50 Little Honda NB 50 Aero PC50_PS50
NN 50 Gyro SA 50 Elite NQ 50 Spree CH 80 Elite NH 80 Aero NH125 Aero
CH 125/150 Elite CH 250 Elite 250 / CN Helix; NSS 250 Reflex; FSC 600 Silverwing
Honda vs. Yamaha scooters
Honda scooters are generally quite reliable, but they have their own personalities. I'm not looking to get into a religious war here :>), but in general, the Hondas seem to hold up better than the Yamahas and they definitely have fewer starting problems than the bigger Yamahas. The Hondas require a little more maintenance, due to the water cooling and need for valve adjustments. New parts are more easily available from your local Honda dealer. Also, new Service Manuals are available from www.helminc.com .
Elite 80 exhaust pipe cracking
The header design on this pipe is somewhat poor. The pipe will crack near the exhaust port on the engine, where the pipe bends. It can be welded or brazed with a little work. If I was going to do this, I'd reinforce the joint by welding on some extra material.
Weak centerstand on the Elite 125/150's
These scooters have a poorly designed centerstand (the "H" shaped stand that holds the rear wheel off the ground) and the metal is too soft around the top of the centerstand and at the frame joint. The main supports on the frame under the engine are weak, and after a while they tend to bend. They will especially tend to bend if you sit on the scooter while it's on the centerstand. There is no easy fix. You'll have to remove the centerstand, and probably cut and re-weld the supports. If I was going through this much trouble, I'd definitely beef up the joint by welding on some more metal.
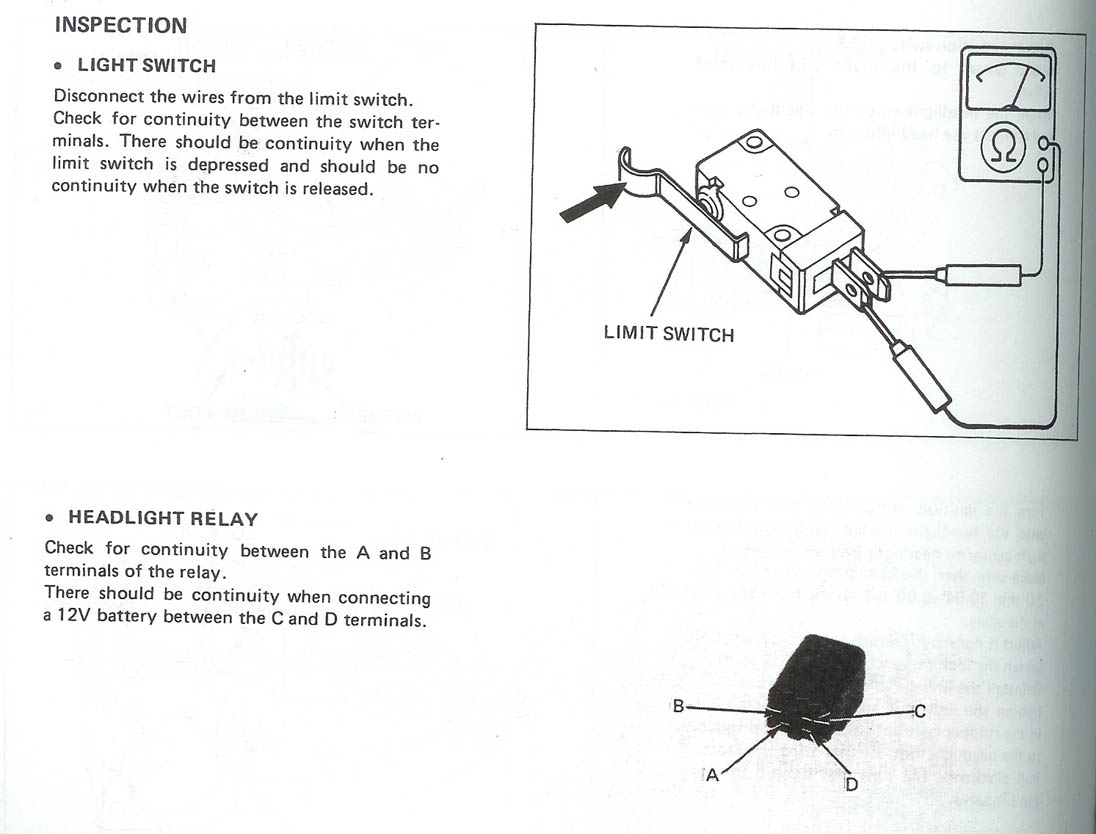
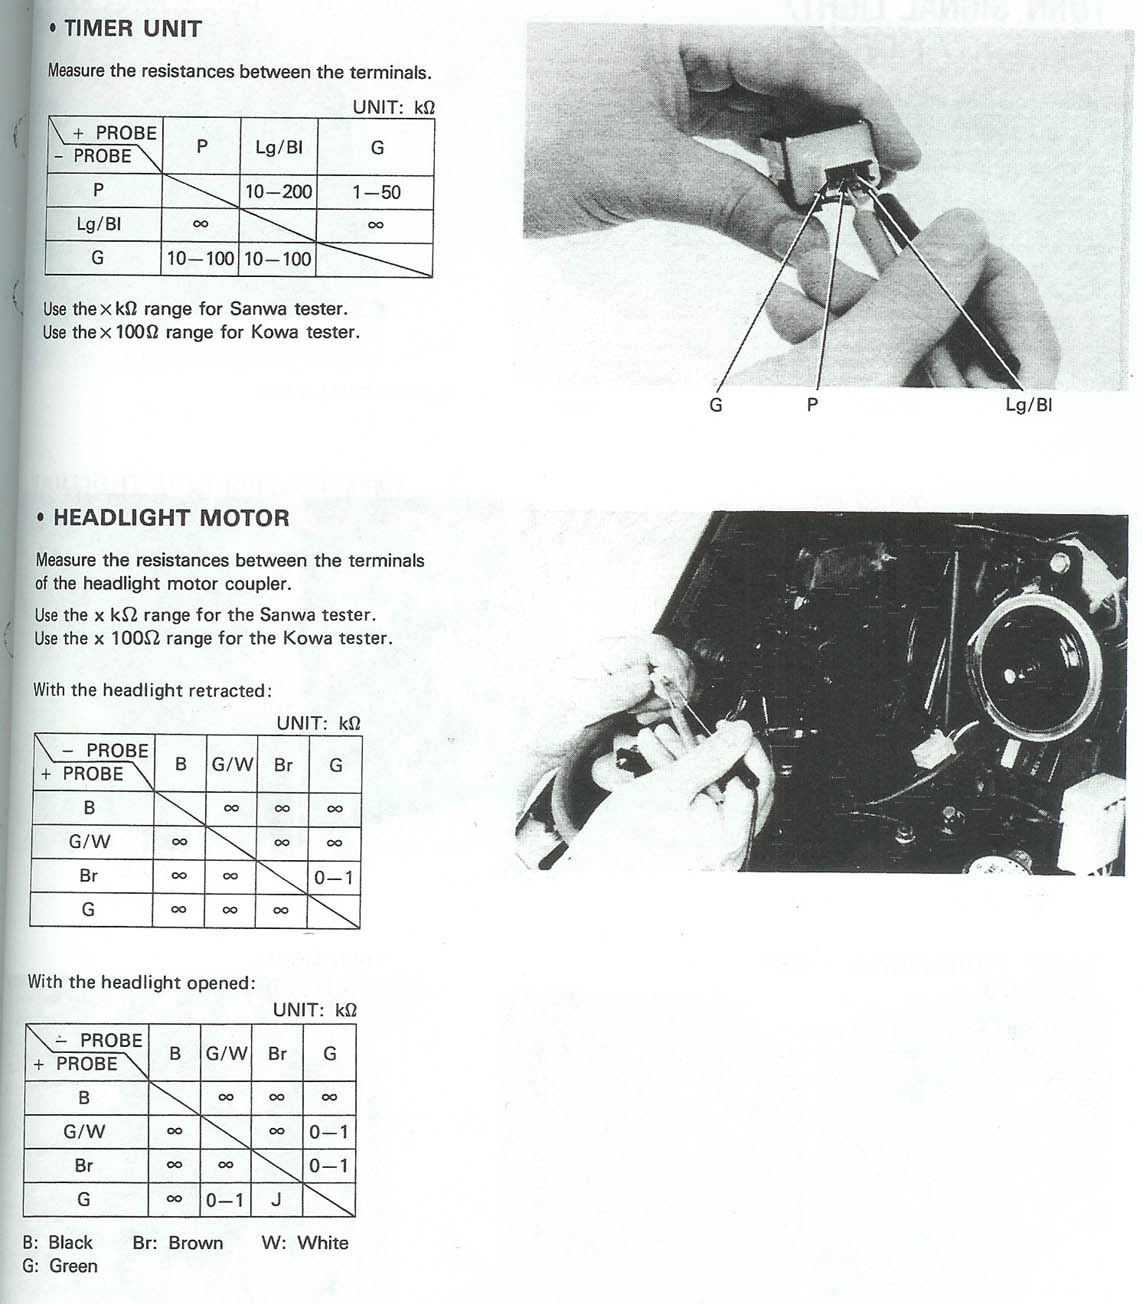
Retractable headlight on the Elite 125 and 150 Deluxe
The pop-up headlight is generally reliable, but after ~15 years it may stop working. The headlight has a fairly complex circuit. There is the limit switch and headlight timer and the headlight motor and headlight relay In my experience the most likely problems are a bad timer or bad motor. The motor is in the black box next to the headlight. The motor is suprisingly small - like the type you get in a model set. There are several plastic gears in the case, some of which wear out over time. You can test the motor by pulling it out of the case and applying 12V to the terminals.
Elite 125/150/250/Helix starter doesn't work
Can't get your starter to engage? A likely cause is a misadjusted rear brake switch. The front brake switch very rarely has problems. When you depress the rear brake, the rear brake switch controls when the brake light turns on. It also completes a connection in the starting circuit. Over time, the wire to the switch can stretch. Then one of two things happen: 1) the brake light doesn't work 2) the scooter doesn't start. The switch is easy to adjust. It is under the floorboard on the left hand side. You have to remove the center cover in front of the engine and the floorboard to get to it. It's also possible to look under the scooter and you should see it, but access can be pretty difficult. You will want to adjust the brake light switch so that the wire is longer. Do this by moving the plastic knurled ring in a clockwise direction. It should only take about 1/2 - 1 turn to get things working again.The problem could also be due to a gummed up switch. See this section for more info. Other possible causes are a dead battery, bad starter solenoid, or a bad starter.
Elite 125/150 engine swap
The Elite 125 (made in 1984) and the Elite 150 Deluxe (made in 1985-1986) are virtually identical. In addition, the '85 and the '87 Elite 150's look different, but underneath the plastic body panels they are also the same as the other models just mentioned. The engines will swap just fine, which can give you a bit of a performance boost if you're going from the 125 -> 150. Heck, it's even possible to shoehorn in an Elite 250 engine. You'll have to remove the centerstand and make some other minor changes.
Elite 50/80/125/150/250 speedometer screw stripping
In order to remove the speedometer cable at the front wheel, you need to remove this screw (Elite 250 wheel shown). The problem is that it's usually stuck in there pretty tight. It's very difficult to remove with a normal screwdriver. The screwdriver usually rounds off the screw head. Then then only way to get it out is with a screw extractor. The softness of the screw combined with the poor phillps design leads to the problem. By far the best way to remove the screw is with a hand impact or electric impact wrench. This works fine about 95% of the time. If the screw strips you'll have to use a screw extractor to get it out.
Elite 80/125/150/250 spark plug cross threading
Unfortunately, it's fairly easy to get the spark plug misaligned when you put it in. The soft aluminum head combined with the funny angle and rather poor access are to blame. Be VERY careful that you don't cross thread the plug. You'll be able to tell because it will be difficult to screw in the spark plug. When it's threaded properly it will screw in with just a light amount of hand pressure. Final tightening can be done with a ratchet.
Elite 125/150/250 carb intake manifold cracking
The rubber and metal intake manifold betwees the carburetor and the cylinder head tends to develop cracks over time, allowing air to get in. This results in a lean condition (too much air for the amount of fuel). Once the manifold cracks it will need to be replaced. The design of this joint is not the best. The carb more or less hangs off of this manifold. There is no support. A very good cure (which Honda did to the Helix) is to add a strip of metal as a support. The support would go between the carb and the cylinder head.
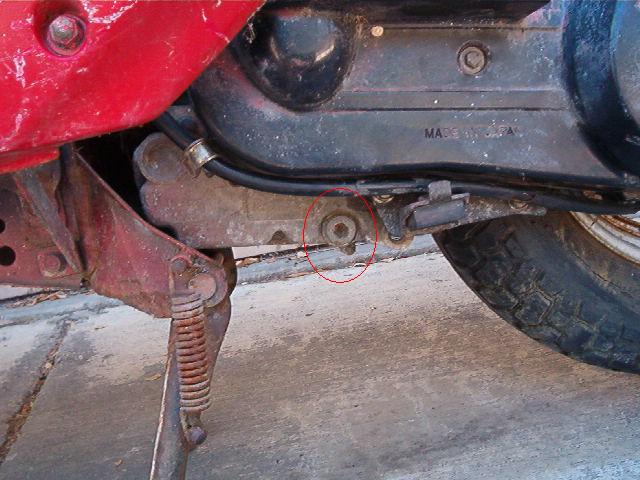
Elite 80 engine oil change
I am separating the Elite 80 from the bigger scooters because it has a unique drain plug location. The drain plug is on the lower left hand side of the engine in the red circle. It is not located under the engine like the other scooters. There is a plug under the engine, that is often taken for the drain plug. This plug contains the cam chain tensioner assembly. If you unscrew this plug, a bit of oil will come out. This makes it seem like it could be the drain plug. If you put the parts back in the correct order (the small metal rod goes in first and then the spring) and screw the bolt back in, there is no harm done. The harm can occur if for some reason you start the scooter with this bolt out, or if you reassemble the parts incorrectly. The cam chain can (and probably will) slip of its sprockets leading to damage and misadjusted valve timing. If this occurs, you will have to disassemble the engine to check for damage and replace any broken or damaged parts.
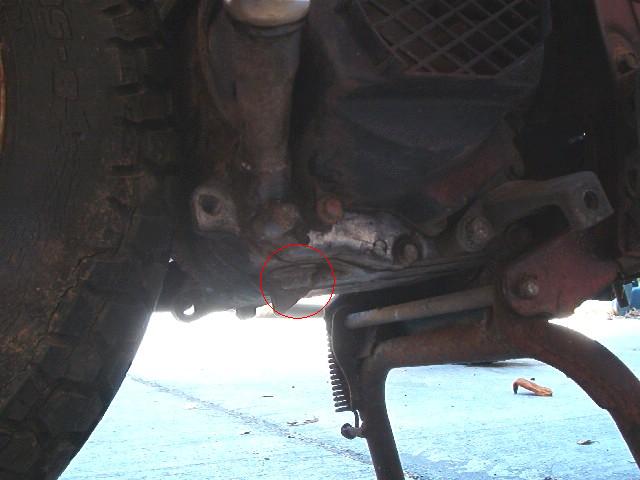
Elite (125, 150, 250) engine oil changes
These four stroke scooters need to have periodic oil changes. The Elite 50's (and most of the Honda 50cc scooters) are two stroke. Their engine oil is injected, so you never have to change it. Unlike the big Yamaha Rivas, unfortunately the Elites do not have an oil filter. They have a metal mesh screen that should be cleaned when changing the oil. This is located on the lower left side of the engine. The Elite 250 has a very soft 17mm cap over the screen. Be very careful (and use good quality tools) when removing this cap or you'll round off the edges. The Elite 125 and the Elite 150 have a better designed 24mm cap in the red circle. Drain the oil from the bottom drain plug. Refill with a great quality synthetic oil (I use Mobil-1 or Castrol synthetic) or a great quality petroleum oil (Castrol GTX, Honda motorcycle oil, Kendall).
Elite 80/125/150/250/Helix oil "light"
The oil light is not actually a light. It is a small wheel (colored green and red), which is hooked by a few gears to the odometer. As the odometer turns a 1000 mile interval, the gears turn the wheel, so that it goes from green to red. This is not an indication of a problem. It only servers to remind you that it's time to change the oil. You should change your oil at least every 1000 miles. See the Maintenance Information section above for your model scooter. There are details on how to change the oil on each maintenance page. After the oil change, just push your key into the small rectangular shaped recess to reset the wheel.Elite 150/250 muffler/rear wheel removal (use similar procedure for the other scooters)
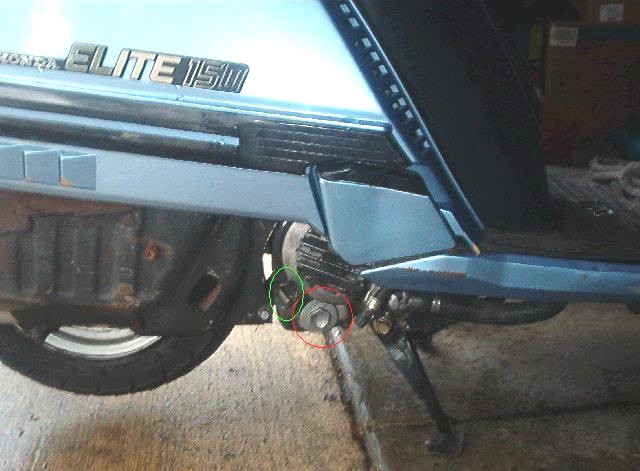
This procedure is not difficult. Remove the plastic left hand engine cover. First remove the two 12mm nuts (they are 10mm on the Elite 150) at the exhaust manifold. Then remove the other three 12mm bolts on the muffler. For the CH150 muffler, the 10mm nuts are circled in green and the 12mm bolts are circled in red (the two green circles on the top right are for the exhaust manifold nuts. You want to remove the two nuts first because you don't want the muffler hanging from the tip of the exhaust pipe. It will put a lot of stress on the tip of the exhaust pipe and the exhaust port. Remove the muffler and lay it aside. There will be an O-ring inside the exhaust port, made of copper or a ceramic type material wedged in between two metal rings. This O-ring should be replaced with a new one so that you'll have a good seal when you re-install the pipe. If you really want, you can usualy re-use the copper O-ring if you anneal it first. Heat it up with a propane torch until it's red hot, then drop it in a pan of water. This process will soften it so that it can be re-used. This only works if the O-ring is copper. [ technical note - It turns out the non ferrous metals like copper and brass do no respond the same way that steel responds when cooled rapidly. While steel becomes harder when cooled rapidly, these other metals are virtually unaffected. You can heat �em up and drop them in water with no ill effects. Water cooling is the preferred method when doing copper annealing because it prevents oxidation.] To remove the rear wheel, remove the two 12mm bolts holding the shock and remove the shock. Remove the 10mm bolt holding the fender bracket. Next, remove the 24mm nut on the axle. An easy way to do this is with an impact driver. If you don't have one, just use a 24mm socket/ratchet or a 24mm box end wrench (a 15/16" socket should also work, but it might be a little small). Depress the rear brake pedal with your right foot and give the ratchet or wrench a wap with a rubber mallet or small piece of 2 X 4. It may be difficult to remove the nut unless you use this type of impact action, especially if the nut is on there really tight. When reinstalling, torque the 24mm nut to 60-65 ft-lbs, and torque the 12mm bolts on the muffler to 20-24 ft-lbs.Elite 125, 150 deluxe and 250 clock battery
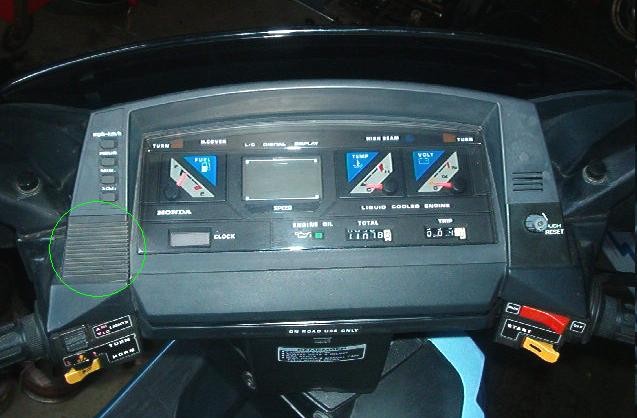
The digital clock on these scooters is powered by a small button battery. The battery is type LR44H, SR44, or 357 silver oxide (all of these are the same battery). On the Elite 125/150, there is a small grill on the left hand side of the instrument cluster. This grill is a cover just pulls of - get you fingernail beneath one side and pry it off. The battery is underneath. On the Elite 250, the battery is under a small cover on the bottom of the speedometer. Slide the cover and pry it up. Then use a small #1 phillips screwdriver to remove the tiny screws. Carefully disassemble the parts beneath to get to the battery.Aero 125, Elite 80/125/150/250, Helix bystarter (choke)
These models use an electric "choke". It's not a standard choke, in the sense that it doesn't choke off the flow of air (and make the fuel/air ratio richer). It is a device that shuts off the flow of air to the starting circuit as the scooter warms up. The bystarter is a small, black cylindrical device with two wires coming out of it. When the engine is running, 12V are applied to these wires. Over about 10 minutes or so, the bystarter warms up as the enging warms up. There is some wax in the bystarter (believe it or not) that is heated by a small heater. It expands, and extends the bystarter needle about 1/8". This is enough to close off the starting circuit. After a number of years, the device builds up electrical resistance and it doesn't do its job any more. A new bystarter has a resistance of about 4 ohms. When resistance builds to over 10 ohms, it should be replaced. To check for proper bystarter function, There is a complex test in the service manual that can be performed, but there is a simple test that works almost as well. Remove the bystarter and examine it. Are the wires in good shape? Is the needle in good shape? Nothing looks broken? Hook up a 12V source to the two wires. After about 10 mintues, the bystarter should become warm, and extend the needle 1/8" or so. Measure it with a pair of verneer calipers or whatever you have handy. If it extends properly it's probably ok. The only sure way to tell if it is bad is to do the full test as described in the service manual. This involves removing the carb and leaving the bystarter attached. Draw a vacuum in the starting circuit outlet. There should be little resistance when the bystarer is cold and plenty of resistance when the bystarter has been heated up. A bad bystarter will either not expand properly or not contract properly. Finding replacements can be difficult. The Elite 125 & 150 bystarters can be replaced with one from a '87 Elite 150. Honda still seems to be making these. The cost is around $65. Replacements for the Elite 250 bystarter can be obtained by ordering a Honda Helix part (they essentially share the same engine). The Elite 80, 125/150 and Elite 250 bystarters are not interchangeable, because they are different lengths.| Type | bystarter length*, cold | bystarter length*, hot |
|---|---|---|
| CH80 | 2.727" | 2.902" |
| CH125/CH150 | 3.285" | 3.442" |
| CH250/Helix | 3.480" | 3.652" |
*Allow about 0.005" for manufacturing variations.
© Copyright 2002-2010 by Jack Stanley.
All Rights Reserved.
|